Dvico Fusion HD Remote with XBMC/Kodi

I have setup Openelec 5.0.2 for a home theatre PC.
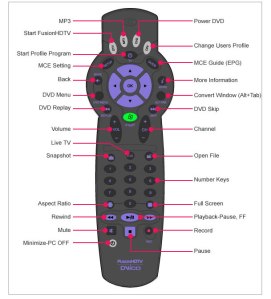
I have an older remote control that came with a Dvico DVB-T tuner card that I wanted to get working. It looks like this:

remotemce3

Unfortunately, there is no default config for this remote so I had to manually create the required files.

Just create the files and copy them to your Openelec system with WinSCP or any other tool.
Step 1. Create the lircd.conf file. I used irrecord for this. /storage/.config/lirc/lircd.conf


# Please make this file available to others
# by sending it to <lirc@bartelmus.de>
#
# this config file was automatically generated
# using lirc-0.9.1-git(dvico) on Sat Feb  7 19:46:46 2015
#
# contributed by
#
# brand:                       /storage/.config/lirc/lircd.conf
# model no. of remote control:
# devices being controlled by this remote:
#

begin remote

  name  dvicofusion
  bits            8
  eps            30
  aeps          100

  one             0     0
  zero            0     0
  pre_data_bits   48
  pre_data       0x100460000
  post_data_bits  8
  post_data      0xFE
  gap          95978
  toggle_bit_mask 0x0

      begin codes
          KEY_1                    0x0B
          KEY_2                    0x17
          KEY_3                    0x1B
          KEY_4                    0x07
          KEY_5                    0x50
          KEY_6                    0x54
          KEY_7                    0x48
          KEY_8                    0x4C
          KEY_9                    0x58
          KEY_0                    0x03
          KEY_ZOOM                 0x13
          KEY_DISPLAYTOGGLE        0x1F
          KEY_REWIND               0x43
          KEY_FASTFORWARD          0x4F
          KEY_PLAYPAUSE            0x47
          KEY_MUTE                 0x57
          KEY_STOP                 0x0D
          KEY_RECORD               0x01
          KEY_POWER                0x4E
          KEY_TV                   0x5A
          KEY_CAMERA               0x52
          KEY_DIRECTORY            0x19
          KEY_VOLUMEUP             0x15
          KEY_VOLUMEDOWN           0x05
          KEY_CHANNELUP            0x11
          KEY_CHANNELDOWN          0x09
          KEY_PREVIOUS             0x0F
          KEY_NEXT                 0x12
          KEY_HOME                 0x42
          KEY_MENU                 0x4D
          KEY_BACK                 0x49
          KEY_NEXTSONG             0x55
          KEY_INFO                 0x59
          KEY_NUMERIC_POUND        0x16
          KEY_EPG                  0x0A
          KEY_OK                   0x5E
          KEY_LEFT                 0x5B
          KEY_RIGHT                0x5F
          KEY_UP                   0x51
          KEY_DOWN                 0x53
          KEY_PVR                  0x02
          KEY_DVD                  0x1A
      end codes

end remote


Step 2. Create the Lircmap.xml file. /storage/.kodi/userdata/Lircmap.xml

<!-- This file contains the mapping of LIRC keys to XBMC keys used in Keymap.xml  -->
<!--                                                                              -->
<!-- How to add remotes                                                           -->
<!-- <remote device=name_Lirc_calls_the_remote>                                 -->
<!--                                                                              -->
<!-- For the commands the layout following layout is used                         -->
<!-- <XBMC_COMMAND>LircButtonName</XBMC_COMMAND>                                  -->
<!--                                                                              -->
<!-- For a list of XBMC_COMMAND's check out the <remote> sections of keymap.xml   -->

<lircmap>

<remote device="dvicofusion">

<power>KEY_POWER</power>
<volumeplus>KEY_VOLUMEUP</volumeplus>
<volumeminus>KEY_VOLUMEDOWN</volumeminus>
<eject>KEY_EJECTCD</eject>
<mute>KEY_MUTE</mute>
<guide>KEY_EPG</guide>

<zero>KEY_0</zero>
<one>KEY_1</one>
<two>KEY_2</two>
<three>KEY_3</three>
<four>KEY_4</four>
<five>KEY_5</five>
<six>KEY_6</six>
<seven>KEY_7</seven>
<eight>KEY_8</eight>
<nine>KEY_9</nine>
<zero>KEY_0</zero>

<pageplus>KEY_CHANNELUP</pageplus>
<pageminus>KEY_CHANNELDOWN</pageminus>
<back>KEY_BACK</back>
<title>KEY_TITLE</title>
<info>KEY_INFO</info>
<display>KEY_DISPLAYTOGGLE</display>
<subtitle>KEY_ZOOM</subtitle>

<select>KEY_OK</select>
<left>KEY_LEFT</left>
<right>KEY_RIGHT</right>
<up>KEY_UP</up>
<down>KEY_DOWN</down>
<menu>KEY_MENU</menu>

<skipminus>KEY_PREVIOUS</skipminus>
<play>KEY_PLAYPAUSE</play>
<skipplus>KEY_NEXT</skipplus>
<reverse>KEY_REWIND</reverse>
<forward>KEY_FASTFORWARD</forward>
<stop>KEY_STOP</stop>
<pause>KEY_PLAYPAUSE</pause>
<start>KEY_HOME</start>
<enter>KEY_HOME</enter>

<pageplus>KEY_CHANNELUP</pageplus>
<pageminus>KEY_CHANNELDOWN</pageminus>

<red>KEY_RED</red>
<green>KEY_GREEN</green>
<yellow>KEY_YELLOW</yellow>
<blue>KEY_BLUE</blue>

</remote>
</lircmap>

Step 3. Create the remote.xml file. /storage/.kodi/userdata/keymaps/remote.xml

<!-- This file contains the mapping of keys (gamepad, remote, and keyboard) to actions within XBMC -->
<!-- The <global> section is a fall through - they will only be used if the button is not          -->
<!-- used in the current window's section.  Note that there is only handling                       -->
<!-- for a single action per button at this stage.                                                 -->
<!-- For joystick/gamepad configuration under linux/win32, see below as it differs from xbox       -->
<!-- gamepads.                                                                                     -->

<!-- The format is:                      -->
<!--    <device>                         -->
<!--      <button>action</button>        -->
<!--    </device>                        -->

<!-- To map keys from other remotes using the RCA protocol, you may add <universalremote> blocks -->
<!-- In this case, the tags used are <obc#> where # is the original button code (OBC) of the key -->
<!-- You set it up by adding a <universalremote> block to the window or <global> section:       -->
<!--    <universalremote>             -->
<!--       <obc45>Stop</obc45>         -->
<!--    </universalremote>            -->

<!-- Note that the action can be a built-in function.                 -->
<!--  eg <B>XBMC.ActivateWindow(MyMusic)</B>                         -->
<!-- would automatically go to My Music on the press of the B button. -->

<!-- Joysticks / Gamepads:                                                                    -->
<!--   See the sample PS3 controller configuration below for the format.                      -->
<!--                                                                                          -->
<!--  Joystick Name:                                                                          -->
<!--   Do 'cat /proc/bus/input/devices' or see your xbmc log file  to find the names of       -->
<!--   detected joysticks. The name used in the configuration should match the detected name. -->
<!--                                                                                          -->
<!--  Button Ids:                                                                             -->
<!--   'id' is the button ID used by SDL. Joystick button ids of connected joysticks appear   -->
<!--   in xbmc.log when they are pressed. Use your log to map custom buttons to actions.      -->
<!--                                                                                          -->
<!--  Axis Ids / Analog Controls                                                              -->
<!--   Coming soon.                                                                           -->
<keymap>
  <global>
    <remote>
      <play>Play</play>
      <pause>Pause</pause>
      <stop>Stop</stop>
      <forward>FastForward</forward>
      <reverse>Rewind</reverse>
      <left>Left</left>
      <right>Right</right>
      <up>Up</up>
      <down>Down</down>
      <select>Select</select>
	  <enter>FullScreen</enter>
      <pageplus>PageUp</pageplus>
      <pageminus>PageDown</pageminus>
      <back>ParentDir</back>
      <menu>ContextMenu</menu>
      <title>ContextMenu</title>
      <info>Info</info>
      <skipplus>SkipNext</skipplus>
      <skipminus>SkipPrevious</skipminus>
      <start>XBMC.ActivateWindow(Home)</start>
      <record>Stop</record>
      <volumeplus>VolumeUp</volumeplus>
      <volumeminus>VolumeDown</volumeminus>
      <mute>Mute</mute>
      <power>XBMC.ActivateWindow(ShutDownMenu)</power>
      <myvideo>XBMC.ActivateWindow(VideoLibrary,MovieTitles)</myvideo>
      <mymusic>XBMC.ActivateWindow(Weather)</mymusic>
      <mypictures>XBMC.ActivateWindow(MyPictures)</mypictures>
      <mytv>XBMC.ActivateWindow(VideoLibrary,TvShowTitles)</mytv>
      <zero>XBMC.RestartApp()</zero>
      <one>Number1</one>
      <two>JumpSMS2</two>
      <three>JumpSMS3</three>
      <four>JumpSMS4</four>
      <five>JumpSMS5</five>
      <six>JumpSMS6</six>
      <seven>JumpSMS7</seven>
      <eight>JumpSMS8</eight>
      <nine>JumpSMS9</nine>
      <hash>Screenshot</hash>
	  <display>FullScreen</display>
    <!-- <star>EjectTray()</star> -->
    <xbox>scanitem</xbox>
    </remote>
  </global>
  <Home>
    <remote>
      <info>XBMC.ActivateWindow(SystemInfo)</info>
      <clear>XBMC.ActivateWindow(Weather)</clear>
      <hash>Screenshot</hash>
    </remote>
  </Home>
  <MyFiles>
    <remote>
      <clear>Delete</clear>
      <zero>Highlight</zero>
      <star>Move</star>
      <hash>Rename</hash>
    </remote>
  </MyFiles>
  <MyMusicPlaylist>
    <remote>
      <back>Playlist</back>      <!-- Close playlist -->
      <clear>Delete</clear>
      <zero>Delete</zero>
    </remote>
  </MyMusicPlaylist>
  <MyMusicPlaylistEditor>
    <remote>
      <zero>Queue</zero>
    </remote>
  </MyMusicPlaylistEditor>
  <MyMusicFiles>
    <remote>
      <zero>Queue</zero>
      <star>Queue</star>
    </remote>
  </MyMusicFiles>
  <MyMusicLibrary>
    <remote>
      <zero>Queue</zero>
      <star>Queue</star>
    </remote>
  </MyMusicLibrary>
  <FullscreenVideo>
    <remote>
      <zero>Number0</zero>
      <one>Number1</one>
      <two>Number2</two>
      <three>Number3</three>
      <four>Number4</four>
      <five>Number5</five>
      <six>Number6</six>
      <seven>Number7</seven>
      <eight>Number8</eight>
      <nine>Number9</nine>
      <left>StepBack</left>
      <right>StepForward</right>
      <up>BigStepForward</up>
      <down>BigStepBack</down>
      <back>PreviousMenu</back>
      <menu>OSD</menu>
      <start>TakeScreenshot</start>
      <select>AspectRatio</select>
      <title>CodecInfo</title>
      <info>Info</info>
      <teletext>XBMC.ActivateWindow(Teletext)</teletext>
      <display>AspectRatio</display>
      <subtitle>ShowSubtitles</subtitle>
      <star>EjectTray()</star>
      <language>AudioNextLanguage</language>
      <hash>Screenshot</hash>
    </remote>
  </FullscreenVideo>
  <VideoTimeSeek>
    <remote>
      <select>Select</select>
      <enter>Select</enter>
    </remote>
  </VideoTimeSeek>
  <FullscreenInfo>
    <remote>
      <title>CodecInfo</title>
      <info>Close</info>
      <menu>OSD</menu>
    </remote>
  </FullscreenInfo>
  <PlayerControls>
    <remote>
      <menu>Close</menu>
    </remote>
  </PlayerControls>
  <Visualisation>
    <remote>
      <left>PreviousPreset</left>
      <right>NextPreset</right>
      <up>IncreaseRating</up>
      <down>DecreaseRating</down>
      <back>LockPreset</back>
      <title>CodecInfo</title>
      <select>XBMC.ActivateWindow(VisualisationPresetList)</select>
      <menu>XBMC.ActivateWindow(MusicOSD)</menu>
      <start>XBMC.ActivateWindow(home)</start>
      <info>Info</info>
	  <subtitle>Playlist</subtitle>
    </remote>
  </Visualisation>
  <MusicOSD>
    <remote>
      <menu>Close</menu>
      <title>Info</title>
      <info>CodecInfo</info>
    </remote>
  </MusicOSD>
  <VisualisationSettings>
    <remote>
      <menu>Close</menu>
      <back>Close</back>
    </remote>
  </VisualisationSettings>
  <VisualisationPresetList>
    <remote>
      <menu>Close</menu>
      <back>Close</back>
    </remote>
  </VisualisationPresetList>
  <SlideShow>
    <remote>
      <zero>ZoomNormal</zero>
      <one>ZoomLevel1</one>
      <two>ZoomLevel2</two>
      <three>ZoomLevel3</three>
      <four>ZoomLevel4</four>
      <five>ZoomLevel5</five>
      <six>ZoomLevel6</six>
      <seven>ZoomLevel7</seven>
      <eight>ZoomLevel8</eight>
      <nine>ZoomLevel9</nine>
      <info>CodecInfo</info>
      <skipplus>NextPicture</skipplus>
      <skipminus>PreviousPicture</skipminus>
      <title>Info</title>
      <select>Rotate</select>
      <back>PreviousMenu</back>
    </remote>
  </SlideShow>
  <ScreenCalibration>
    <remote>
      <select>NextCalibration</select>
      <zero>ResetCalibration</zero>
      <display>NextResolution</display>
      <xbox>NextResolution</xbox>
    </remote>
  </ScreenCalibration>
  <GUICalibration>
    <remote>
      <select>NextCalibration</select>
      <zero>ResetCalibration</zero>
    </remote>
  </GUICalibration>
  <SelectDialog>
    <remote>
      <back>Close</back>
    </remote>
  </SelectDialog>
  <VideoOSD>
    <remote>
      <back>PreviousMenu</back>
      <menu>Close</menu>
      <start>Close</start>
    </remote>
  </VideoOSD>
  <VideoMenu>
    <remote>
      <menu>OSD</menu>
      <back>PreviousMenu</back>
      <info>Info</info>
      <title>CodecInfo</title>
      <zero>Number0</zero>
      <one>Number1</one>
      <two>Number2</two>
      <three>Number3</three>
      <four>Number4</four>
      <five>Number5</five>
      <six>Number6</six>
      <seven>Number7</seven>
      <eight>Number8</eight>
      <nine>Number9</nine>
      <play>Select</play>
    </remote>
  </VideoMenu>
  <OSDVideoSettings>
    <remote>
      <back>Close</back>
      <menu>Close</menu>
      <start>Close</start>
    </remote>
  </OSDVideoSettings>
  <OSDAudioSettings>
    <remote>
      <back>Close</back>
      <menu>Close</menu>
      <start>Close</start>
    </remote>
  </OSDAudioSettings>
  <VideoBookmarks>
    <remote>
      <back>Close</back>
      <menu>Close</menu>
      <start>Close</start>
      <zero>Delete</zero>
    </remote>
  </VideoBookmarks>
  <MyVideoLibrary>
    <remote>
      <zero>Queue</zero>
      <clear>Delete</clear>
    </remote>
  </MyVideoLibrary>
  <MyVideoFiles>
    <remote>
      <zero>Queue</zero>
      <star>Queue</star>
    </remote>
  </MyVideoFiles>
  <MyVideoPlaylist>
    <remote>
      <back>Playlist</back>      <!-- Close playlist -->
      <clear>Delete</clear>
      <zero>Delete</zero>
    </remote>
  </MyVideoPlaylist>
  <VirtualKeyboard>
    <remote>
      <back>BackSpace</back>
      <star>Shift</star>
      <hash>Symbols</hash>
      <zero>Number0</zero>
      <one>Number1</one>
      <two>Number2</two>
      <three>Number3</three>
      <four>Number4</four>
      <five>Number5</five>
      <six>Number6</six>
      <seven>Number7</seven>
      <eight>Number8</eight>
      <nine>Number9</nine>
      <enter>Enter</enter>
      <pageminus>CursorLeft</pageminus>
      <pageplus>CursorRight</pageplus>
    </remote>
  </VirtualKeyboard>
  <ContextMenu>
    <remote>
      <title>Close</title>
      <back>Close</back>
    </remote>
  </ContextMenu>
  <FileStackingDialog>
    <remote>
      <back>Close</back>
    </remote>
  </FileStackingDialog>
  <Scripts>
    <remote>
      <info>info</info>
    </remote>
  </Scripts>
  <NumericInput>
    <remote>
      <zero>Number0</zero>
      <one>Number1</one>
      <two>Number2</two>
      <three>Number3</three>
      <four>Number4</four>
      <five>Number5</five>
      <six>Number6</six>
      <seven>Number7</seven>
      <eight>Number8</eight>
      <nine>Number9</nine>
      <enter>Enter</enter>
      <back>BackSpace</back>
    </remote>
  </NumericInput>
  <Weather>
    <remote>
      <back>PreviousMenu</back>
    </remote>
  </Weather>
  <Settings>
    <remote>
      <back>PreviousMenu</back>
    </remote>
  </Settings>
  <AddonBrowser>
    <remote>
    </remote>
  </AddonBrowser>
  <AddonInformation>
    <remote>
      <back>Close</back>
    </remote>
  </AddonInformation>
  <AddonSettings>
    <remote>
      <back>Close</back>
    </remote>
  </AddonSettings>
  <TextViewer>
    <remote>
      <back>Close</back>
    </remote>
  </TextViewer>
  <MyPicturesSettings>
    <remote>
      <back>PreviousMenu</back>
    </remote>
  </MyPicturesSettings>
  <MyProgramsSettings>
    <remote>
      <back>PreviousMenu</back>
    </remote>
  </MyProgramsSettings>
  <MyWeatherSettings>
    <remote>
      <back>PreviousMenu</back>
    </remote>
  </MyWeatherSettings>
  <MyMusicSettings>
    <remote>
      <back>PreviousMenu</back>
    </remote>
  </MyMusicSettings>
  <SystemSettings>
    <remote>
      <back>PreviousMenu</back>
    </remote>
  </SystemSettings>
  <MyVideosSettings>
    <remote>
      <back>PreviousMenu</back>
    </remote>
  </MyVideosSettings>
  <NetworkSettings>
    <remote>
      <back>PreviousMenu</back>
    </remote>
  </NetworkSettings>
  <AppearanceSettings>
    <remote>
      <back>PreviousMenu</back>
    </remote>
  </AppearanceSettings>
  <Profiles>
    <remote>
      <back>PreviousMenu</back>
    </remote>
  </Profiles>
  <systeminfo>
    <remote>
      <back>PreviousMenu</back>
    </remote>
  </systeminfo>
  <shutdownmenu>
    <remote>
      <back>PreviousMenu</back>
    </remote>
  </shutdownmenu>
  <submenu>
    <remote>
      <back>PreviousMenu</back>
    </remote>
  </submenu>
  <MusicInformation>
    <remote>
      <back>Close</back>
    </remote>
  </MusicInformation>
  <MovieInformation>
    <remote>
      <info>Close</info>
      <back>Close</back>
    </remote>
  </MovieInformation>
  <LockSettings>
    <remote>
      <menu>Close</menu>
      <back>PreviousMenu</back>
    </remote>
  </LockSettings>
  <ProfileSettings>
    <remote>
      <menu>Close</menu>
      <back>PreviousMenu</back>
    </remote>
  </ProfileSettings>
  <PictureInfo>
    <remote>
      <skipplus>NextPicture</skipplus>
      <skipminus>PreviousPicture</skipminus>
      <info>Close</info>
      <back>Close</back>
    </remote>
  </PictureInfo>
  <Teletext>
    <remote>
      <zero>number0</zero>
      <one>number1</one>
      <two>number2</two>
      <three>number3</three>
      <four>number4</four>
      <five>number5</five>
      <six>number6</six>
      <seven>number7</seven>
      <eight>number8</eight>
      <nine>number9</nine>
      <info>Info</info>
      <back>Close</back>
      <menu>Close</menu>
      <start>Close</start>
      <teletext>Close</teletext>
    </remote>
  </Teletext>
  <Favourites>
    <remote>
      <back>Close</back>
    </remote>
  </Favourites>
</keymap>

Step 4. Create the autorun script to start lircd on startup. /storage/.config/autostart.sh

#!/bin/sh
 
killall lircd
lircd --driver=dvico --device=/dev/usb/hiddev0 /storage/.config/lirc/lircd.conf

Give the machine a restart and your remote should be working!
Logging HP Lefthand cluster utilisation part 2

Continue on from part 1.

I have had some feedback from people with more than one cluster in their Lefthand management group.

I have updated the script so that it now works in both single and multiple cluster environments.

I have also added -append to the csv export. This will continue to append data into the csv file, rather than overwriting the file.
This will allow you to pull the data into Excel for simple graphing.

$user = "USERNAME"
$pass = "PASSWORD"
$hostsystem = "CLUSTER_VIP"

$XML = [XML](cliq getgroupinfo login=$hostsystem username=$user password=$pass output=xml)
 
$Report = @()
if ($XML.gauche.response.group.cluster.name.Count -eq 1)
{
    # Needed for single cluster Management Groups
    $Row.CLUSTER = $XML.gauche.response.group.cluster.name
    $Row.SPACETOTAL = [Math]::Round((($XML.gauche.response.group.cluster.spaceTotal)/1024/1024),2)
    $Row.UNPROVISIONEDSPACE = [Math]::Round((($XML.gauche.response.group.cluster.unprovisionedSpace)/1024/1024),2)
    $Row.PROVISIONEDSPACE = [Math]::Round((($XML.gauche.response.group.cluster.spaceTotal-$XML.gauche.response.group.cluster.unprovisionedSpace)/1024/1024),2)
    $Row.DATE = Get-Date
    $Report += $row
} else {
    for ($x = 0; $x -lt $XML.gauche.response.group.cluster.name.Count; $x++) {
        # Needed for multi-cluster Management Groups
        $Row = "" | select CLUSTER, SPACETOTAL, UNPROVISIONEDSPACE, PROVISIONEDSPACE, DATE #blank row
        $Row.CLUSTER = $XML.gauche.response.group.cluster.name[$x]
        $Row.SPACETOTAL = [Math]::Round((($XML.gauche.response.group.cluster.spaceTotal[$x])/1024/1024),2)
        $Row.UNPROVISIONEDSPACE = [Math]::Round((($XML.gauche.response.group.cluster.unprovisionedSpace[$x])/1024/1024),2)
        $Row.PROVISIONEDSPACE = [Math]::Round((($XML.gauche.response.group.cluster.spaceTotal[$x]-$XML.gauche.response.group.cluster.unprovisionedSpace[$x])/1024/1024),2)
        $Row.DATE = Get-Date
        $Report += $row
    }
}

$Report | Export-Csv "C:\Logging\lefthand\utlisation.csv" -NoTypeInformation -append    # dump the report to .csv

$nodes = $XML.SelectNodes("/gauche/response/group/cluster/volume")
$VReport = @()
for ($x = 0; $x -lt $nodes.Count; $x++){
$Vrow = "" | select NAME, CLUSTER, SIZE, CONSUMEDSPACE, PROVISIONEDSPACE, THIN, PRIMARY, DATE     # blank row
$Vrow.NAME = $nodes.Item($x).name                         # Add the data to the row
$Vrow.CLUSTER = $nodes.Item($x).clusterName
$Vrow.SIZE = $nodes.Item($x).size # Size of the volume
if ($nodes.Item($x).consumedSpace){
$Vrow.CONSUMEDSPACE = $nodes.Item($x).consumedSpace
} else {
$Vrow.CONSUMEDSPACE = $nodes.Item($x).provisionedSpace
}
$Vrow.PROVISIONEDSPACE = $nodes.Item($x).provisionedSpace
$Vrow.THIN = $nodes.Item($x).thinProvision
$Vrow.PRIMARY = $nodes.Item($x).isPrimary
$Vrow.DATE = Get-Date
$VReport += $Vrow
}

$VReport | Export-Csv "C:\Logging\lefthand\volumeUtlisation.csv" -NoTypeInformation -append    # dump the report to .csv

Please let me know how you find the script!

HP Storevirtual and Application Aware Snapshots

If, like me, you’re tired of trawling through the maze that is the HP website – this should hopefully point you in the right direction!

I’m using a HP Lefthand/Storevirtual SAN with VMware vCentre.

To get an application consistent snapshot of a server, you need to Quiesce the disk to ensure all current activities have been written to disk.

In the Operating System, this is done through the Volume Shadow Copy Service (VSS).
From the Hypervisor, this can be triggered in the guest os through VMware tools. This happens automatically when a VMware snapshot is taken. The Hypervisor tells the OS through VMtools that it is being backed up and needs to run VSS.
Now the tricky part is how do we tell the OS when the storage is taking a snapshot?

To get an Application Consistent snapshot of a VM from the storage device, we need to send the request to Quiesce the disk down the line
That is, Storage -> Hypervisor -> Guest Operating System

In this case – HP Lefthand OS -> HP Lefthand Application Aware Snapshot Mgr software -> vCenter -> VMtools -> VSS

Pre Reqs:

  • Make sure your storage devices can reach vCentre. In many cases your iSCSI network your nodes run on won’t be the same network as your vCentre management. You will need to either add a nic in the iSCSI network on your vCentre server, or configure routing/firewall between these networks. Put simply, your nodes need to be able to access vCentre.

Steps:

  • Install HP Lefthand Application Aware Snapshot Mgr software (vCenter needs to be installed on Windows, you’re out of luck if you run the vCenter Appliance)
  • Configure the Snapshot Mgr software with appropriate credentials for your Lefthand Management Groups
  • For each server in the CMC you will need to configure the controlling server as the IP Address of the vCentre server. This needs to be an IP address that the Lefthand nodes can access
  • In my case, I needed to run the Pegasus CIM Object Manager service with the same account that vCentre services*
    • This service gets installed with the App Aware Snapshot Mgr. You need to run this with the same account as vCentre as it needs to login and perform snapshots on VM’s.

*Before I set Pegasus to run as my vCentre service account I had this error:

Error retrieving volume list from application server at x.x.x.x ILED: Connection to VS Server Failed.
InitializeSecurityContext() failed!!! -2146893022
To create a point-in-time snapshot, click Continue.

This error indicates that the Pegasus service does not have permission to perform the required actions in vCentre.

Any questions or comments?

Logging HP Lefthand cluster utilisation

Note: Please see part 2.

Unsurprisingly, when managing a SAN, I needed to track our rate of disk space consumption.

Underwhelmed by HP’s own reporting tools, I decided I needed to roll my own.

I wanted to:

  • Log total cluster utilisation – track usage, determine growth rate, etc.
  • Log volume utilisation and size – track where consumption is growing, etc.

Pretty straightforward stuff, but a more complex that it ought to be.

  1. Connect to SAN via CLIQ through Poweshell
  2. Output info in XML format
  3. Parse info, export into CSV (one for total cluster utilisation, one for volume-by-volume utilisation)
  4. Import CSV into Splunk for logging

The code below does the following

  1. Connects to the cluster – I created a read-only account since the user//pass is in plain text.
  2. Runs the cliq command getgroupinfo – this outputs a lot of data. Not a problem in our small environment, but could take a long time to run in a large or complex environment.
  3. Import the getgroupinfo output into an XML PowerShell object
  4. Output and format required data into CSV

I run this script as a twice-daily scheduled task, and import it into Splunk on the same schedule. This way, I have a log of all my volume and total cluster usage. Within Splunk I can run reports to generate usage graphs, alerts and trend data.

If you don’t use a logging product like Splunk, you could export this data into a database and do with it what you will!

$user = "USERNAME"
$pass = "PASSWORD"
$hostsystem = "CLUSTER_VIP"

$XML = [XML](cliq getgroupinfo login=$hostsystem username=$user password=$pass output=xml)

$Report = @()
$Row = "" | select CLUSTER, SPACETOTAL, UNPROVISIONEDSPACE, PROVISIONEDSPACE, DATE #blank row
$Row.CLUSTER = $XML.gauche.response.group.cluster.name
$Row.SPACETOTAL = [Math]::Round((($XML.gauche.response.group.cluster.spaceTotal)/1024/1024),2)
$Row.UNPROVISIONEDSPACE = [Math]::Round((($XML.gauche.response.group.cluster.unprovisionedSpace)/1024/1024),2)
$Row.PROVISIONEDSPACE = [Math]::Round((($XML.gauche.response.group.cluster.spaceTotal-$XML.gauche.response.group.cluster.unprovisionedSpace)/1024/1024),2)
$Row.DATE = Get-Date
$Report += $row

$Report | Export-Csv "C:\Logging\lefthand\utlisation.csv" -NoTypeInformation     # dump the report to .csv

$nodes = $XML.SelectNodes("/gauche/response/group/cluster/volume")
$VReport = @()
for ($x = 0; $x -lt $nodes.Count; $x++){
$Vrow = "" | select NAME, CLUSTER, SIZE, CONSUMEDSPACE, PROVISIONEDSPACE, THIN, PRIMARY, DATE     # blank row
$Vrow.NAME = $nodes.Item($x).name                         # Add the data to the row
$Vrow.CLUSTER = $nodes.Item($x).clusterName
$Vrow.SIZE = $nodes.Item($x).size # Size of the volume
if ($nodes.Item($x).consumedSpace){
$Vrow.CONSUMEDSPACE = $nodes.Item($x).consumedSpace
} else {
$Vrow.CONSUMEDSPACE = $nodes.Item($x).provisionedSpace
}
$Vrow.PROVISIONEDSPACE = $nodes.Item($x).provisionedSpace
$Vrow.THIN = $nodes.Item($x).thinProvision
$Vrow.PRIMARY = $nodes.Item($x).isPrimary
$Vrow.DATE = Get-Date
$VReport += $Vrow
}

$VReport | Export-Csv "C:\Logging\lefthand\volumeUtlisation.csv" -NoTypeInformation     # dump the report to .csv

Also, a big thanks to Greg’s Powershell/CLIQ blog article here.

Objects not listed in vSphere 5.1 Web Client

After an upgrade from ESX 4.1U2 and vCenter Server 4.1U2 to ESXi 5.1 and vCenter 5.1 – we were keen to try out the new Web Client.

Unfortunately, not all hosts, clusters, vApps, or VM’s were listed in the vSphere 5.1 Web Client. Datacenters appeared as normal – but we had whole clusters simply missing from the Web Client, which was alarming to say the least.

After confirming, and reconfirming that hosts and VM’s were running correctly in the ‘thick’ client it was time to dig a little deeper.

I checked that the permissions on these objects were correct, and confirmed that the clusters and hosts were configured correctly.

Then I created a new cluster in one of our troublesome Datacenters. This appeared correctly in the Web Client. With this success, I decided to remove one of our problem hosts from it’s cluster and add it to this new, test cluster.
Lo and behold the ESXi host appeared in the Web Client.

From there it was a ‘simple’ matter of putting each host into maintenance mode and moving it to this new cluster. This task was made more arduous by the fact that you cannot move vApp’s between clusters, so these were manually re-created in the new cluster.

It would be good to know why this was the case and why it only happened with some clusters.
My guess is there is some compatibility issue with clusters that were created in specific versions of ESX/ESXi. I suspect the troublesome clusters were quite old and may have been created in ESX 3.x

vSphere Replication – VRA vCenter Server connection failed: Cannot complete login due to an incorrect user name or password.

After following the simple instructions to install VRA 5.1 on vCenter/ESXi 5.1 I ran into an unusual issue.

The .ova deployed normally, but the vSphere Replication add-on did not appear in the Web Client.

I logged onto the web interface of the VRA to find an error:
VRA vCenter Server connection failed: Cannot complete login due to an incorrect user name or password.

I attempted redeploying the .ova and some troubleshooting, including entering the managed IP for vCenter. (http://communities.vmware.com/message/2131841)

Still no luck.

Instead I logged onto the VRA through SSH and had a look at /var/log/messages and found this:

Jan 10 04:39:45 localhost sudo:     root : TTY=unknown ; PWD=/opt/vmware/hms ; USER=vrms ; COMMAND=/opt/vmware/hms/va-util.sh –cmd checkversion –host host.domain.com –port 80 –thumbprint xx:xx:xx:xx:xx:xx:xx:xx:xx:xx:xx:xx –extkey com.vmware.vcHms –keystore /opt/vmware/hms/security/hms-keystore.jks –keypass vmware –keystorepass vmware –keystorealias jetty –evsurl https://domain.com/vsm/extensionService –evstoken xxxxxxxxxxxxxxxxxxxxxxxxxxxxxxx –evsthumbprint xx:xx:xx:xx:xx:xx:xx:xx:xx:xx:xx:xx

It looks like it is using the domain name only to connect to the Extension Virtual Machine url.
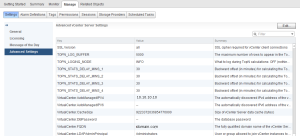
Sure enough, the VirtualCenter.FQDN of the server has been entered incorrectly.
I changed this to the correct FQDN, redeployed the .ova and VRA was up and running.

vCenter-FQDN-error

Most likely a configuration issue when installing vCenter, but this was not picked up since it didn’t seem to cause any other noticeable issues with vCenter.